- Please give a comment after reading, you may ask or request
- You may copy-paste the content, as long as you put a direct link to my blog
- I made the tutorials after tried it first, these are my real pictures
- Enjoy and please share it to your friends ^^
Hallo bro dan sist, :D
this would be my first tutorial about picture editing using photoshop ^^.
this time i'd like to guide you guys about how to make "Out of Bound" pictures. i've tested the tutorial first before write it down, so this tutorial is based on my trial. So do exactly the same as what you read (you may make some trial though :)_ and sorry for my ugly face (#pffttt)
the result, more or less, should be like this---
My Final Result
Out Of Bound, where the object looks
like going out of the frame
Klick show to see the steps
1. ok, first you have to use a picture, open it in photoshop
2. next, you have to make a new empty layer, it would be the background of the picture.
3. you may choose your favorite colors, in this trial i used green (look at the result).
4. to make it easier in work, you may unclick the "eye" icon, it would make the content of the basic layer dissapear
5. i used the gradient color as the background, you may make it as you like. you could hit "G" to open the gradient window
.
6. choose as showed in the last picture, than click on the empty screen and drag it from corner to corner, just like the picture shows
7. this is my result using gradient, u may choose another color
8. reappear the basic layer, click the eye icon you hit before.
9. this is the editing process. choose "marquee" tool (M). then make a square on the half of the picture (look at the picture). if you selected the wrong place, you may delete it using (CTRL+D).
10. once you made the square, look at the top options bar, choose (EDIT - TRANSFORM - PERSPECTIVE).
11. the square you made before should look different. click the top corner (whichever) and drag it to the middle of the picture. the top side of the square would be smaller than the bottom side.
12. next, finish it by hitting the (CTRL+Enter), don't click any tools (it may erase the square). choose (add layer mask). if you don't know where it is, the pictures shows you.
13. the picture would be cut according to the square we made before. next you make a new layer from the edited layer, select the layer then hit (CTRL+J).
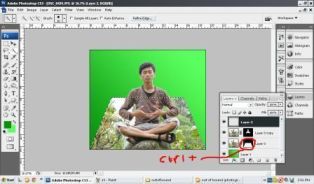
14.select the new layer, then select the mask (the one which is consist of black and white), right click and choose delete option.
15. the mask should be gone now. the next part would be tricky, you have to separate the object (in this picture the object is my self) that you wanted to make it look like out of the picture. choose Quick Selection Tool (W) and try to take just the object, no background picture allowed to be selected. in this picture, the trees and the sky should not be selected, just select the whole body .
16. the result would be, my body covered by dashed line, which is mean ready to edit. choose add vector mask (if you do not know where it is, the next picture will show you).
17. voila! the picture should be look like my picture.
18. next, make a new layer, choose Layer - New - Layer.
19. keep on the new layer, click (CTRL+click mask in the first masked layer).
20. look at the top options bar, click Edit - Stroke. make the px "40" and the color should be "White", this color would be the frame of the final picture (look at the frame in the result picture)
21. if you doing it right, your picture should have a white line on it. you just have to arrange the layer in the right order. you have to rearrange the layers until the white line placed behind the object (see the picture)
22. everything has set up. click (SHIFT+all layers except the background layer_the one white the green color). remember, EXCEPT the Background layer. then you do right-click, choose "Merge Layers" (CTRL+E).
23. the whole selected layers would fused. you may stop right here, the tricks is done. but if you want to make the the frame curved and look just like a real photograph, select he layer, choose Edit - Transform - Warp. there would be 9 squares on your picture.
24. click and hold the bottom-corner point, drag it up a little bit. it would make the picture curved. you may make it based on your desire, as long as the object (the body) not curved.
25. to make it look like real, make the shadow below the picture. make a new layer.
26. select he empty layer, click "Brush" (B). choose the black color ( how to set it, look at the picture), then brush the area below the picture. in this step, you have to be able to make the right amount of black brush, to make the brush look like a real shadow of the picture. if it is too thick, you may reduce the opacity to "50".
next step would be SHOW IT UP TO YOUR FRIENDS!!
you may create other pictures using this trick, as long as you know what you are doing and don't mess up too much. have a good editing-day my fellow friends, wait for my next tutorials!!!


4 comments:
Wah tutorialnya lengkap.
Jago sotosop nih kayanya haha.
ahaha, g juga juragan, masih sebatas baru bisa juga...
makasi udah mampir ^^
wahhhh.....kereen gan!
ini yg ane cari''!! sayaang gambarnya agak kecil...mungkin maksud agan biar gx berat yaa!?
gan kasi tutor tentang letivasi donk...yg melayang'' gituu!
ahaha, makasi banget gan, semoga berhasi praktek.
dulu sih pengennya bikin levitasi dulu baru bikin ini, tapi g sempet2,
nyusul deh.
di update terus aja ya ^^
Post a Comment