1. the important thing here is the font, you may
DOWNLOAD HERE.
first, we gonna need "Pen Tool" (P).
2. using the "Pen Tool", you have to be able to select the face, exactly the face without letting any hair included in it.
3.after selected the whole face, you have to make the selection as smooth as possible, yo don't want people think you are a novice in photoshop. use "Convert Point Tool".
4. with the convert tool, you could fix the rough line you created using pen tools before.
5. well...at least it'll look better...
6. once you finished, open "Path" window, if you can't find it, look at the picture. once you find it give a right-click on the layer and choose "Make Selection"
7. the object would be surrounded by dashed line. next, create a new copied layer. look at the top options bar, choose Layer- New - Layer Via Copy (CTRL+J)
8. you'll have a new layer with your face only in it. from now on, you are working in this layer. to make te work easier, just hide the original picture, click "eye" icon beside the layer.
9. click "Image - Adjustment - Black and White"
10. Make a new Layer "Layer - New - Layer"
11. a new empty layer would appear on the top list of layers. move it below the face layer, click and drag down until the position of the empty layer is now below the face layer. hit "D" to make the basic color back to black and white. take "Paint" tool (G).
12. choose the empty layer, then click the workboard so then the whole board is black.
13. make a new layer, the use "Brush Tool" (B). make sure you are working on the last empty layer.
14. load the brush you've downloaded. look at he brush window, find a small arrow and click, an option window should appear, click Load Brush. (look at the picture)
15. in the same Brush Window, you'll see the brush you've loaded. there will be new brushes in it, look like small dots. we will use this to build your face, make sure the foreground is 'White' and you are working on the empty layer.
16. you have to use the brush on the object (face). the more you put the brush on it, the more solid the face would be. contrarily, the less you put the brush on it, the less solid the face would be and form a scattered effect. Look at the picture for illustration.
17. make sure that you are working on the empty layer and the oppacity is in 100%.
18. click and hold together (CTRL+ALT+
layer with the brush inside). you'll see so many dashed lines. choose the layer with the face inside, copy paste (CTRL+C -- CTRL+V)
19. there will be a new layer with the face that already formed by some letters. hide all layers except the new one, choose "Burn Tool". try to smooth the margin of the solid face.
20. make a new window, choose File - New. follow the instruction in the picture.
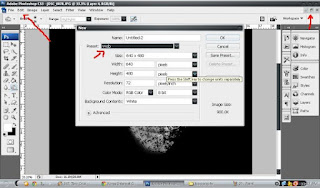 |
gambarnya salah, harusnya panahnya mengarah ke file
bukan ke edit |
21. there will be 2 windows, the one with our edited picture, the other one is an empty window. you have to move the edited layer to the new window. click the layer, and drag it to the new window.
22. if the picture is too large for the board, zoom out the board (CTRL + -). click the face and hit (CTRL+T). now you can minify the face, dont forget to hold "Shift" key to make sure the picture size would be like the original, once you done hit (CTRL+enter).
23. take White Color as the foreground color, take the brush one more time (B). click "Brush Tip Shape (see picture).
24. put the brush on_or_around the face. the trick is, you have to make it seems logical, i put the brush out of the face to make people think tat the face is being blown by the wind.


